Introduction
When dealing with sump pumps, bilge pumps, or any water pumping system, a float switch becomes one of the most critical components. It automates the pump’s operation based on the water level, offering convenience and preventing overflow or pump damage. Among the numerous float switches available, the Sure Bail 470017 float switch stands out for its reliability and easy setup.
In this guide, we will cover everything you need to know about the Sure Bail 470017 float switch wiring diagram, including an overview of its features, a step-by-step wiring explanation, common mistakes to avoid, troubleshooting tips, and FAQs.
Whether you’re a professional installer or a DIY enthusiast, this article will help you understand the correct wiring method for the Sure Bail 470017 float switch.
What is a Sure Bail 470017 Float Switch?
The Sure Bail 470017 float switch is a simple, yet highly effective electrical component used in pump systems. It acts as an automatic on/off switch depending on the water level.
When the water level rises, the float inside the switch lifts, completing the electrical circuit and powering the pump. When the water drops, the float falls and breaks the circuit, turning the pump off. This mechanism helps prevent dry running and unnecessary energy consumption.
Key Features
- Heavy-duty construction for durability in harsh environments.
- Wide voltage compatibility (commonly 12V, 24V, and 120V systems).
- Manual override options in some models.
- Corrosion-resistant materials suitable for marine and sump applications.
- Simple 2-wire or 3-wire configuration for easy installation.
Understanding the Sure Bail 470017 Float Switch Wiring Diagram
Before you begin wiring, it’s essential to understand the float switch’s internal design. The Sure Bail 470017 typically comes with two or three wires depending on the model. The diagram shows:
- Common wire (C) – Usually black.
- Normally Open (NO) wire – Often red.
- Normally Closed (NC) wire – Sometimes white or blue.
Here’s a basic breakdown:
- Normally Open (NO): The circuit is open (off) when the float is down, and closes (on) when the float rises with the water.
- Normally Closed (NC): The circuit is closed (on) when the float is down and opens (off) when the float rises.
In most sump pump or bilge pump setups, the NO connection is used, because we want the pump to activate only when the water rises.
Step-by-Step Wiring Instructions
Here’s how you can wire the Sure Bail 470017 float switch correctly:
Materials Needed:
- Sure Bail 470017 Float Switch
- Electrical connectors
- Electrical tape
- Wire strippers
- Waterproof heat shrink tubing (for outdoor/marine use)
- Pump motor
Step 1: Identify the Wires
First, locate the wires from the float switch:
- Black wire = Common (C)
- Red wire = Normally Open (NO)
- White or Blue wire (if present) = Normally Closed (NC)
If your model only has two wires, one is the common and the other is the NO.
Step 2: Connect the Float Switch to the Pump
Using the Normally Open (NO) connection:
- Connect the black (common) wire from the float switch to the positive wire of the pump.
- Connect the red (NO) wire to the positive supply line (battery or main AC supply through a fuse).
- The negative wire of the pump connects directly to the negative supply line.
Step 3: Secure and Waterproof the Connections
Use waterproof heat shrink tubing or waterproof wire connectors, especially in outdoor or marine applications, to prevent corrosion or shorts.
Step 4: Test the Setup
- Lift the float manually: The pump should turn ON.
- Lower the float: The pump should turn OFF.
If the opposite happens, double-check if you mistakenly connected the NC wire instead of the NO.
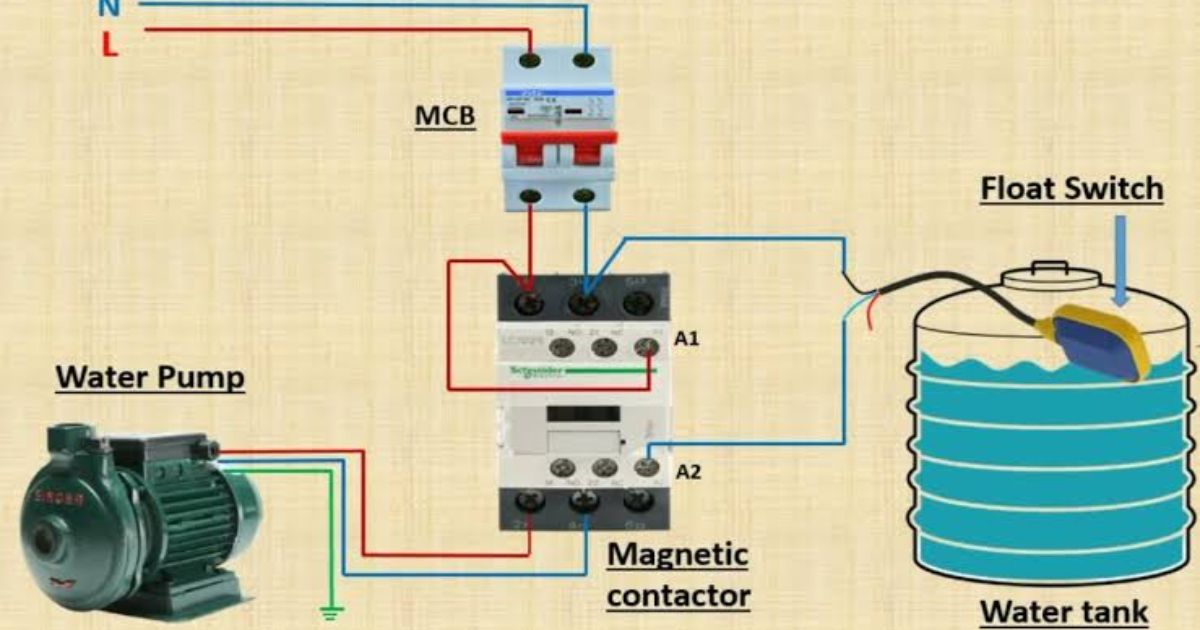
Sure Bail 470017 Float Switch Wiring Diagram – Visual Explanation
Here’s a simple visual description of the wiring setup:
[Battery/Supply +] ----> [Red Wire (NO) Float Switch]
[Black Wire (Common) Float Switch] ----> [Pump Positive Terminal]
[Pump Negative Terminal] ----> [Battery/Supply -]
When the float rises:
- The red and black wires connect internally.
- Current flows to the pump.
- Pump turns ON.
When the float drops:
- The circuit breaks.
- Pump turns OFF.
Common Mistakes to Avoid
- Using the NC (Normally Closed) connection incorrectly:
Always use the NO terminal unless you have a specific need for the NC configuration. - Failing to waterproof the connections:
Especially important for marine or sump pump use, where humidity or water splashes are common. - Incorrect voltage supply:
Ensure your pump and float switch are rated for the same voltage (e.g., 12V, 24V, 120V). - Skipping a fuse:
Always add an inline fuse between the power supply and the switch to protect against short circuits. - Loose connections:
Vibration from pumps can loosen wires. Use strong, tight connectors.
Troubleshooting Sure Bail 470017 Float Switch Wiring
Problem: Pump Doesn’t Start
- Check if you are connected to the NO (Normally Open) wire.
- Inspect if the supply voltage is reaching the float switch.
- Verify the float switch’s internal contacts with a multimeter.
Problem: Pump Runs Continuously
- You may have accidentally connected the NC (Normally Closed) wire.
- Float might be stuck in the UP position. Clean it and check for debris.
Problem: Pump Never Shuts Off
- Again, likely a wrong connection.
- Or the float mechanism is damaged and not dropping.
Applications of Sure Bail 470017 Float Switch
The Sure Bail 470017 is versatile and can be used in many different systems, including:
- Residential sump pumps
- Boat bilge pumps
- Industrial water tanks
- Aquariums and fish farms
- Agricultural irrigation systems
- Septic tanks
- HVAC condensate pumps
Its heavy-duty build makes it reliable for both fresh and saltwater environments.
Sure Bail 470017 Float Switch Best Practices
To maximize the life and efficiency of your Sure Bail 470017 float switch:
- Mount it properly: Use float brackets or clamps to ensure free movement.
- Regularly inspect: Clean off debris, algae, or scale buildup.
- Secure wires: Avoid dangling wires that could pull on terminals.
- Protect from freezing: In cold climates, ensure the switch is protected from freezing water, which can damage the float mechanism.
Conclusion
The Sure Bail 470017 float switch wiring diagram might seem complicated at first glance, but it’s actually very straightforward once you understand the basics. Following a simple step-by-step approach ensures that your pump system operates reliably, automatically, and safely.
Whether you’re installing a new pump system, replacing an old float switch, or troubleshooting a setup, knowing the correct wiring method is crucial. Proper installation of the Sure Bail 470017 will give you peace of mind, knowing that your system will handle rising water levels without constant supervision.
Take your time, double-check your connections, and you’ll have a perfectly working pump setup using the Sure Bail 470017 float switch!
FAQs
Q1: Can I use the Sure Bail 470017 with any pump?
Yes, as long as the voltage ratings match and the current draw is within the switch’s specifications.
Q2: Does it matter which wire I connect first?
No specific order, but ensure correct matching of Common and NO wires for proper operation.
Q3: How can I tell if the float switch is bad?
Use a multimeter to check continuity between the common and NO wires while lifting the float. No continuity = switch is bad.
Q4: Can the Sure Bail 470017 be used for draining and filling applications?
Yes, by using the NC terminal, you can wire it for fill control instead of drain control.
Q5: How often should I replace my float switch?
A good quality switch like the Sure Bail 470017 can last many years, but it’s wise to inspect it annually and replace if it shows wear.